关于SpringBoot打Jar包
1.概述
之前开发spring-boot项目一般都是直接制作一个可执行的jar包(当时只会这种方式😀),这种方式制作出来的jar十分庞大,往往都是几十上百兆的文件大小,有时候对项目只是简单的修改,重新打包,然后去部署的时候,往往需要传一个庞大的jar包上去,还是挺不友好的。后面就花时间了解了一下关于打Jar包相关的类容。还有一种是打成war包。
主要讲述两种常见的打包方式,一种是通过spring-boot-maven-plugin插件制作完整的包含依赖的可执行jar,另外一种是maven-jar-plugin打包出来的依赖分离的方式。
2.spring-boot-maven-plugin制作可执行jar包
在pom.xml中build配置
 1
 2
 3
 4
 5
 6
 7
 8
 9
10
11
12
13
14
15
16
17
18
19
20
21
22
23
24
25
26
27
28
29
30
31
32
| <build>
<plugins>
<plugin>
<groupId>org.apache.maven.plugins</groupId>
<artifactId>maven-compiler-plugin</artifactId>
<version>3.8.1</version>
<configuration>
<source>1.8</source>
<target>1.8</target>
<encoding>UTF-8</encoding>
</configuration>
</plugin>
<plugin>
<groupId>org.springframework.boot</groupId>
<artifactId>spring-boot-maven-plugin</artifactId>
<version>${spring-boot.version}</version>
<configuration>
<mainClass>com.ruayou.springspitest.SpringSpiTestApplication</mainClass>
<skip>false</skip>
</configuration>
<executions>
<execution>
<id>repackage</id>
<goals>
<goal>repackage</goal>
</goals>
</execution>
</executions>
</plugin>
</plugins>
</build>
|
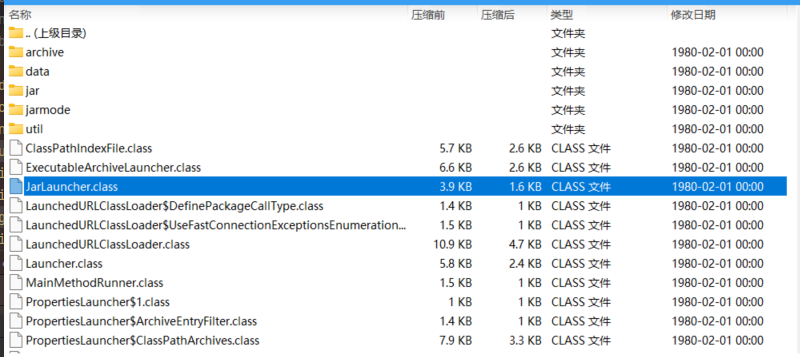
使用上述的插件打包之后的jar包结构是这样的,只是一个很简易的项目,依赖并不多,但是jar包文件大小来到了8.5m

在Java项目中,Manifest.MF文件是JAR文件的清单文件,它包含了JAR包的元数据信息,所以这里重点关注一下\META-INF\MANIFEST.MF文件
 1
 2
 3
 4
 5
 6
 7
 8
 9
10
11
12
| Manifest-Version: 1.0
Archiver-Version: Plexus Archiver
Created-By: Apache Maven 3.8.6
Built-By: yuaner
Build-Jdk: 17.0.9
Main-Class: org.springframework.boot.loader.JarLauncher
Start-Class: com.ruayou.springspitest.SpringSpiTestApplication
Spring-Boot-Version: 2.6.13
Spring-Boot-Classes: BOOT-INF/classes/
Spring-Boot-Lib: BOOT-INF/lib/
Spring-Boot-Classpath-Index: BOOT-INF/classpath.idx
Spring-Boot-Layers-Index: BOOT-INF/layers.idx
|
这里发现一个问题,我们实际在pom.xml文件中配置的mainClass是
<mainClass>com.ruayou.springspitest.SpringSpiTestApplication</mainClass>
但是清单文件中的Main-Class: org.springframework.boot.loader.JarLauncher,
我们自己配置的是Start-Class: com.ruayou.springspitest.SpringSpiTestApplication
我们确实能在jar包中根据这个包路径找到这个JarLauncher
用idea打开这个字节码文件,可以实现反编译。(
后面发现更好的方式😀
1
2
3
4
| <dependency>
<groupId>org.springframework.boot</groupId>
<artifactId>spring-boot-loader</artifactId>
</dependency>
|
在项目依赖中引入,就可以直接利用idea下载源码查看啦。这个依赖是引入了springboot打包插件的时候打包自动集成到jar包的。引入之后可以直接在项目中搜索需要查看到的类
)
我们可以看到这个字节码文件的大致代码是
 1
 2
 3
 4
 5
 6
 7
 8
 9
10
11
12
13
14
15
16
17
18
19
20
21
22
23
24
25
26
27
28
29
30
31
32
33
34
35
36
37
38
39
40
41
42
43
44
45
| public class JarLauncher extends ExecutableArchiveLauncher {
private static final String DEFAULT_CLASSPATH_INDEX_LOCATION = "BOOT-INF/classpath.idx";
static final Archive.EntryFilter NESTED_ARCHIVE_ENTRY_FILTER = (entry) -> {
return entry.isDirectory() ? entry.getName().equals("BOOT-INF/classes/") : entry.getName().startsWith("BOOT-INF/lib/");
};
public JarLauncher() {
}
protected JarLauncher(Archive archive) {
super(archive);
}
protected ClassPathIndexFile getClassPathIndex(Archive archive) throws IOException {
if (archive instanceof ExplodedArchive) {
String location = this.getClassPathIndexFileLocation(archive);
return ClassPathIndexFile.loadIfPossible(archive.getUrl(), location);
} else {
return super.getClassPathIndex(archive);
}
}
private String getClassPathIndexFileLocation(Archive archive) throws IOException {
Manifest manifest = archive.getManifest();
Attributes attributes = manifest != null ? manifest.getMainAttributes() : null;
String location = attributes != null ? attributes.getValue("Spring-Boot-Classpath-Index") : null;
return location != null ? location : "BOOT-INF/classpath.idx";
}
protected boolean isPostProcessingClassPathArchives() {
return false;
}
protected boolean isSearchCandidate(Archive.Entry entry) {
return entry.getName().startsWith("BOOT-INF/");
}
protected boolean isNestedArchive(Archive.Entry entry) {
return NESTED_ARCHIVE_ENTRY_FILTER.matches(entry);
}
public static void main(String[] args) throws Exception {
(new JarLauncher()).launch(args);
}
}
|
确实存在一个main方法,其实不难看出这里执行的就是加载"BOOT-INF/classpath.idx"文件和"BOOT-INF/lib/"下的文件。
索引文件实际就是列举了项目中依赖的jar路径,也就是我们制作的这个巨大的jar包是包含了项目的所有依赖的。
我们继续细看main方法执行的launch方法
 1
 2
 3
 4
 5
 6
 7
 8
 9
10
11
| protected void launch(String[] args) throws Exception {
if (!this.isExploded()) {
JarFile.registerUrlProtocolHandler();
}
ClassLoader classLoader = this.createClassLoader(this.getClassPathArchivesIterator());
String jarMode = System.getProperty("jarmode");
String launchClass = jarMode != null && !jarMode.isEmpty() ? "org.springframework.boot.loader.jarmode.JarModeLauncher" : this.getMainClass();
this.launch(args, launchClass, classLoader);
}
|
可以看到就是创建了一个类加载器去加载什么东西?具体怎么加载,是一个方法调用,下面会跟进。
在创建 类加载器的时候this.getClassPathArchivesIterator()
 1
 2
 3
 4
 5
 6
 7
 8
 9
10
11
12
13
14
15
16
17
18
19
20
21
22
23
24
25
26
27
28
29
30
31
32
33
34
| @Override
protected Iterator<Archive> getClassPathArchivesIterator() throws Exception {
Archive.EntryFilter searchFilter = this::isSearchCandidate;
Iterator<Archive> archives = this.archive.getNestedArchives(searchFilter,
(entry) -> isNestedArchive(entry) && !isEntryIndexed(entry));
//上述isNestedArchive判断逻辑在JarLauncher中实现的,isEntryIndexed在ExecutableArchiveLauncher实现
if (isPostProcessingClassPathArchives()) {
archives = applyClassPathArchivePostProcessing(archives);
}
return archives;
}
//JarLauncher中的实现
@Override
protected boolean isNestedArchive(Archive.Entry entry) {
return NESTED_ARCHIVE_ENTRY_FILTER.matches(entry);
}
//只加载下面两个目录文件
static final EntryFilter NESTED_ARCHIVE_ENTRY_FILTER = (entry) -> {
if (entry.isDirectory()) {
//我们自己写的代码的字节码文件
return entry.getName().equals("BOOT-INF/classes/");
}
//依赖的jar包
return entry.getName().startsWith("BOOT-INF/lib/");
};
//判断jar包是否在索引文件
private boolean isEntryIndexed(Archive.Entry entry) {
if (this.classPathIndex != null) {
return this.classPathIndex.containsEntry(entry.getName());
}
return false;
}
|
总的来说就是拿到 jar 包(当前应用)找到的所有 JarFileArchive
// 返回 jar 包(当前应用)找到的所有 JarFileArchive
// `BOOT-INF/classes/` 目录对应一个 JarFileArchive(因为就是我们自己写的应用中的内容)
// `BOOT-INF/lib/` 目录下的每个 jar 包对应一个 JarFileArchive
这个注意到getMainClass()在子类的实现是这样的
 1
 2
 3
 4
 5
 6
 7
 8
 9
10
11
12
13
| protected String getMainClass() throws Exception {
Manifest manifest = this.archive.getManifest();
String mainClass = null;
if (manifest != null) {
mainClass = manifest.getMainAttributes().getValue("Start-Class");
}
if (mainClass == null) {
throw new IllegalStateException("No 'Start-Class' manifest entry specified in " + this);
} else {
return mainClass;
}
}
|
这拿到的Start-Class全类名不就是清单中我们自己指定的那个自己写的主类吗😄
继续看launch方法
1
2
3
4
| protected void launch(String[] args, String launchClass, ClassLoader classLoader) throws Exception {
Thread.currentThread().setContextClassLoader(classLoader);
this.createMainMethodRunner(launchClass, args, classLoader).run();
}
|
run方法
1
2
3
4
5
6
| public void run() throws Exception {
Class<?> mainClass = Class.forName(this.mainClassName, false, Thread.currentThread().getContextClassLoader());
Method mainMethod = mainClass.getDeclaredMethod("main", String[].class);
mainMethod.setAccessible(true);
mainMethod.invoke((Object)null, this.args);
}
|
可以看出来就是加载了我们的主类之后,通过反射的方式调用我们自己写的启动类main方法,同时实现了参数的传递。
不得不说确实巧妙🚀
3.maven-jar-plugin制作依赖分离的jar包
在pom.xml中build配置
 1
 2
 3
 4
 5
 6
 7
 8
 9
10
11
12
13
14
15
16
17
18
19
20
21
22
23
24
25
26
27
28
29
30
31
32
33
34
35
36
37
38
39
40
41
42
43
44
45
46
47
48
49
| <build>
<plugins>
<plugin>
<groupId>org.apache.maven.plugins</groupId>
<artifactId>maven-compiler-plugin</artifactId>
<version>3.8.1</version>
<configuration>
<source>1.8</source>
<target>1.8</target>
<encoding>UTF-8</encoding>
</configuration>
</plugin>
<plugin>
<groupId>org.apache.maven.plugins</groupId>
<artifactId>maven-dependency-plugin</artifactId>
<executions>
<execution>
<!-- 绑定生命周期 -->
<phase>package</phase>
<goals>
<goal>copy-dependencies</goal>
</goals>
<!-- 设置依赖的存放路径 -->
<configuration>
<outputDirectory>app/lib</outputDirectory>
</configuration>
</execution>
</executions>
</plugin>
<plugin>
<groupId>org.apache.maven.plugins</groupId>
<artifactId>maven-jar-plugin</artifactId>
<version>3.1.2</version>
<!-- 对插件进行个性化配置 -->
<configuration>
<archive>
<manifest>
<!-- 将入口类添加到 MANIFEST.MF 中 -->
<mainClass>com.ruayou.springspitest.SpringSpiTestApplication</mainClass>
<addClasspath>true</addClasspath>
<!-- 将依赖的存放位置添加到 MANIFEST.MF 中-->
<classpathPrefix>./lib/</classpathPrefix>
</manifest>
</archive>
<outputDirectory>app</outputDirectory>
</configuration>
</plugin>
</plugins>
</build>
|
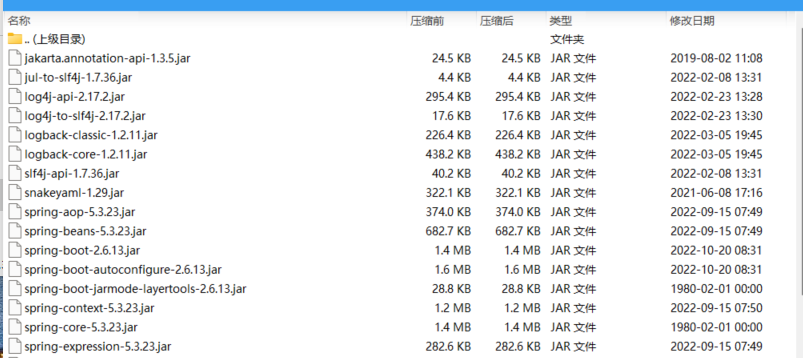
上述操作还利用了maven-dependency-plugin进行依赖jar包的复制。然后在maven-jar-plugin中也指定了classpathPrefix前缀,也就是我们提取的lib文件夹的相对路径,我这里打包之后的目录结构是
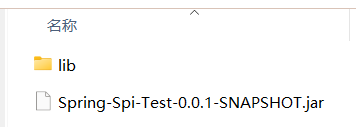
之后迁移到服务器运行的时候也必须是这样的结构,lib文件夹和生成的jar同一级目录。
jar包的结构如下

com目录下就是我们自己编写的代码字节码文件,重点关注的是MANIFEST.MF文件
 1
 2
 3
 4
 5
 6
 7
 8
 9
10
11
12
13
14
| Manifest-Version: 1.0
Created-By: Maven Archiver 3.4.0
Build-Jdk-Spec: 17
Class-Path: ./lib/spring-boot-starter-2.6.13.jar ./lib/spring-boot-2.6.1
3.jar ./lib/spring-context-5.3.23.jar ./lib/spring-aop-5.3.23.jar ./lib
/spring-beans-5.3.23.jar ./lib/spring-expression-5.3.23.jar ./lib/sprin
g-boot-autoconfigure-2.6.13.jar ./lib/spring-boot-starter-logging-2.6.1
3.jar ./lib/logback-classic-1.2.11.jar ./lib/logback-core-1.2.11.jar ./
lib/log4j-to-slf4j-2.17.2.jar ./lib/log4j-api-2.17.2.jar ./lib/jul-to-s
lf4j-1.7.36.jar ./lib/jakarta.annotation-api-1.3.5.jar ./lib/spring-cor
e-5.3.23.jar ./lib/spring-jcl-5.3.23.jar ./lib/snakeyaml-1.29.jar ./lib
/slf4j-api-1.7.36.jar ./lib/Spring-Spi-EnableAutoConfiguration-0.0.1-SN
APSHOT.jar ./lib/Spring-Spi-Import-0.0.1-SNAPSHOT.jar
Main-Class: com.ruayou.springspitest.SpringSpiTestApplication
|
Class-Path里面的每一项都有我们buid时候设置的前缀./lib,所以是能够找到我们依赖的jar包的。
Main-Class也是直接启动我们自己定义的那个启动类。这算是比较传统的一种jar包启动方式。